Warren Toomey
Email: wkt@cs.adfa.edu.au
Printed June 2, 2000
The aim of this workshop is to try and complete most of the following objectives:
There are some caveats with this workshop. Firstly, you need to have reasonable experience with using Unix, navigating around the filesystem, editing files, monitoring processes, setting file permissions etc. Secondly, I have not presented this workshop before, so it is likely that I will run overtime. I am hoping to cover all of the above, but I would rather cover some topics well than cover all of the topics poorly.
The provisional timetable for the full-day workshop is as follows.
| Time | Activity |
| 9:00 | Introduction to FreeBSD |
| 9:30 | Installation of FreeBSD |
| 10:30 | Morning tea |
| 10:45 | Configuration of /etc, user accounts, packages |
| 11:30 | Kernel recompilation |
| 12:15 | Lunch, catch-up time |
| 1:00 | Installation of ports: ssh |
| 1:30 | Network services: Apache, Samba |
| 3:00 | Tightening security |
| 3:30 | Afternoon tea, catch-up time |
| 4:00 | Security continued |
| 4:30 | Consolidation & review, other topics |
Apart from the introduction and consolidation, everything in the workshop is hands-on. By the end of the day you should have installed and configured a working Internet or Intranet server providing e-mail, logins, FTP, web and SMB file services.
This workshop will show you how to set up a PC to be a network server using FreeBSD, suitable for a small business or a department. You could certainly set FreeBSD up as a desktop system, but that would require another workshop.
Some of the attributes I prefer to see in a small network server are ease of setup and maintenance, and good performance for the price. One major server attribute I expect is reliability: ideally, the server should perform its tasks 24 hours a day, 7 days a week, without interruption. It would also be useful if the server was flexible: its configuration could be changed while the server kept running, with minimal impact on the services provided.
A common solution for a small to mid-size Internet or Intranet server is to install an an NT server. So, why am I proposing a FreeBSD solution rather than NT? There are several reasons to prefer FreeBSD, or indeed any Unix system, to NT.
Firstly, FreeBSD is derived from the 4BSDs from the University of California, Berkeley. Therefore, it contains the standard Internet protocol implementation. The network code has been under constant development and refinement since 1982, and is now mature, dependable, and meets more Internet standards than the TCP/IP code in any other operating system class.
FreeBSD is also a Unix system. Ok, so there isn't a nice GUI by default, and you actually have to know where the configuration files are and what they do, but anecdotal evidence suggests that Unix on the whole is more reliable than NT. I run a moderately busy web/FTP/mail server, and I have never had a kernel crash1 in the last four years. The only time my server is rebooted is when I have to change the hardware configuration, or when we have a power failure.
FreeBSD is pretty cheap when compared to NT, too. In fact it's freely available via the Internet, although you can buy a copy of the distribution on CD-ROM. The number of clients for FreeBSD is also unlimited. But there's more!2 FreeBSD is an Open Source product, so you get full, unrestricted access to its source code. This allows you to `tweak' the operation of the kernel and the applications. Patches to security flaws are usually distributed within days of the flaws' discovery.
Finally, FreeBSD is particularly aimed at being a network server, although it is also ideal as a general Unix server, or even as a desktop box. I also have a personal preference for FreeBSD. However, any of the available free or commercial Unix systems, such as Linux, NetBSD, OpenBSD, SCO Unix or BSD/OS, would make a suitable network server solution. Each one of these systems has its strengths and weaknesses, and this may be important in specific applications. But not here.
FreeBSD is an Unix-like operating system based on 4.4BSD. 4.4BSD was the last Berkeley Software distribution from the CSRG. There have been many improvements to 4.4 made since its code was integrated into FreeBSD in 1995, such as an improved virtual memory subsystem, packet filtering, ELF binaries, and a huge number of device drivers.
FreeBSD currently only runs on Intel and Alpha platforms, although there are projects underway to port it to other systems. Other Unix systems like NetBSD, OpenBSD and Linux do run on several platforms. FreeBSD, however, has been optimised for the Intel/PC platform.
FreeBSD development is ongoing: at any time, there are at least two streams of development: a `stable' stream known as STABLE, and a `bleeding edge' stream known as CURRENT. Sometimes, earlier streams continue to have bug fixes and security patches applied. As at May, 2000, we have:
I'd recommend that new FreeBSD installations use the latest snapshot release on the 4-STABLE branch. 4.0 has a few bugs affecting specific devices, but otherwise it has proven to be rock-solid and reliable.
Note: FreeBSD 4.1-RELEASE is due out near the end of June, 2000. If it is available by the date of the workshop, we will use 4.1 instead of 4.0.
In this workshop, we will install FreeBSD 4.0 using FTP onto some form of Pentium platform. I have no idea what the exact hardware setup will be as I write this, so we will have some fun.
Your system's performance will depend on the hardware used. This includes the video card, the size of hard disks and their performance, the amount of RAM, network cards, and of course the motherboard and CPU. Once you have decided the system's purpose, choose the hardware to best meet this purpose.
A bare minimum FreeBSD platform is a 386 CPU with 8Megs of memory and 100Megs of hard disk. This isn't going to be terribly suitable for a network server, unless you are setting up a filtering router. More likely, you will want a Pentium-class PC with at least 16Megs of memory and 200Megs of hard disk.
FreeBSD can find most common hardware devices when it is installed. See
the Hardware FAQ at
http://www.au.freebsd.org/FAQ, and the `HARDWARE.TXT' file that
comes with the version you plan to install.
If required, you should set your hardware's configuration to match that of the FreeBSD generic kernel. Alternatively, you can often change the generic kernel's parameters to match your hardware. If you have installation problems, then perhaps you should start with the minimal amount of hardware to do the installation.
FreeBSD installation can be done from:
For the latter two methods, you must set up the directory structure so that it matches what the installation is going to look for. At this stage, you should read the files `README.TXT' and `INSTALL.TXT', which come with FreeBSD. It is best to read these before the installation! I've included `README.TXT' as an Appendix, but you can also get both files from any of the FreeBSD ftp servers, such as ftp://ftp.au.freebsd.org. Both files, along with other documentation, are available once you have booted the FreeBSD install boot floppy.
FreeBSD requires at least one spare primary partition on your hard disk. If you only have a DOS/Windows partition on your hard disk, and you wish to continue using DOS/Windows, then you will need to shrink your DOS partition to make room for FreeBSD. You can use the utility FIPS.EXE, available on all FreeBSD ftp sites, to easily repartition your disk. You should defragment your DOS/Windows partition before you run FIPS.EXE.
Activity: As I have no idea what the system configuration will be, you may need to do the following. If Windows occupies the entire hard disk, defragment C: to move all the files to the front of the disk. Then use FIPS.EXE from a floppy to decrease the size of the C: partition, leaving at least 300M of unused disk space for FreeBSD.Alternatively, if we are permitted to, you can wipe Windows entirely and use the whole disk space for FreeBSD. This will make the install faster.
As with most Unix installations, the final Unix disk space is divided into several sections, e.g /, /usr, /var, /home etc. If you are going to use the system as a file server, then consider how you want to allocate your disk space. You will need at least 30Megs for /, and the rest you have to decide for yourself.
FreeBSD installation starts with a boot floppy (kern.flp) and a filesystem floppy (mfsroot.flp). You need to obtain both floppy images and write them directly to floppies. These images are usually found in the floppies directory in each FreeBSD distribution. FreeBSD provides tools such as RAWRITE.EXE to write the images direct to floppy. Of course, if you have an existing Unix system, you can use dd instead.
Activity: You will be provided with the two floppy disks. Once there is adequate unused disk space on the hard disk, shutdown Windows and read on. Alternatively, if you are going to destroy Windows completely, don't do anything. We can take Windows out from within the FreeBSD installation process.
We are going to do a network installation, because I have been told that the machines don't have CD-ROM drives. That's fine, as I maintain a mirror of the FreeBSD software in Canberra. A bonus of doing a network install is that you do your system's network configuration as part of the installation.
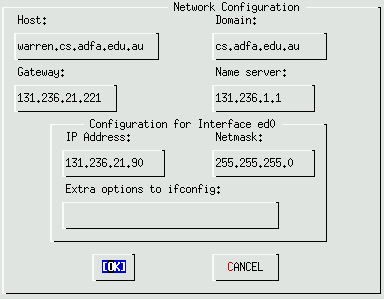
If you choose to do a network install, you will need to know in advance the following parameters: type of Ethernet card used, IP address and domain name of machine, IP address of default gateway, Network mask, and IP address of one domain name server. Hopefully, these will be printed on a sheet for you on the day of the workshop.
Note: FreeBSD can use DHCP to obtain most of these parameters. However, it doesn't make much sense to set up a network server which has a dynamic and changing IP address.
At this point, the notes will degenerate from a high level of wordy, descriptive prose to a more succinct statement of what we are doing and what's going on. I get my 3rd year students to install FreeBSD, and I find that they learn a hell of a lot more by sinking and swimming, than by being hand-held along the process. However, here are some lifejackets which might help you along:
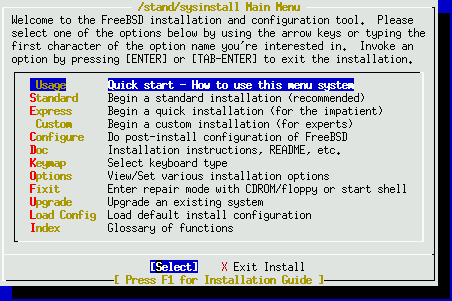
To give you an overview of the FreeBSD installation process, the main steps are:
Insert the boot floppy, reboot the machine, wait for 2-3 minutes for the floppy to load. When you are asked to insert the MFS root floppy, remove the boot floppy, insert the root filesystem floppy and press `Enter'. Once the root filesystem is loaded into RAM, you will be given the Kernel configuration menu; press `Enter' again. The kernel then probes for configured devices; this takes about a minute. You should then receive the main FreeBSD install menu.
The main FreeBSD install menu is used to configure and install the system. Arrows move between selections, Enter selects, space toggles. Choose a `Standard' install for this installation; it will give some running commentary and explanation along the way.
The first thing to do is to create a primary partition for FreeBSD. This depends on if you kept a Windows partition, or want to use the whole disk.
If you resized the Windows partition, you should now have some space left over. Select the disk you want to partition (ad0). Command `C' creates a `DOS' partition in which FreeBSD will live4. The default size is the spare space on the disk.
If you decided to trash Windows completely, use the `D' command to delete any existing slices, and use the `A' command to use the entire disk. Choose to use a true partition entry, so that you can install the Boot Manager. Type `Q' when done. Choose to install the FreeBSD Boot Manager: this will allow you to boot to Windows, or to FreeBSD, via a boot menu.
We now need to create Unix partitions inside the FreeBSD slice, i.e places for /, /usr etc. Choosing `A' will get you automatic defaults. If you choose to make partitions manually, start with 0 partitions, and make one at a time. Any DOS partitions also on your hard disks can also be made mountable.
I prefer to set up the partition sizes manually. Remember, / needs 30M or more. Swap depends on your physical memory, and your expected server usage: choose at least 32M for swap. You may just choose to make the remaining disk space mounted on /usr. If you do this, you will need to place home directories in /usr/home, and move /var to /usr/var (and symlink /var to /usr/var).
For today, I would recommend 30M for /, 32M for swap, 32M for /var and the rest for /usr. Use the `C' command four times, set the size in megabytes, and the appropriate mount points. Type `Q' when done. At this stage, nothing has been written to the disk.
What parts of FreeBSD to install depend on your requirements. You certainly won't need all of the source code. I suggest you get kernel source, full binaries and docs: this will allow you to rebuild the generic kernel to support only your hardware, thus saving some memory: therefore, choose `Kern-Developer' or `X-Kern-Developer'. You are given the option to install cryptographic software; say No. You also are asked if you want to install the FreeBSD ports; say Yes here. This will add about 15 minutes to the installation time, but FreeBSD's port concept is so useful that you will want to make use of it.
If you chose `X-Kern-Developer', you will need to select the X Windows components you require. The default set will do for us today. Go into the Fonts sub-menu and choose 100 DPI fonts and Speedo/scalable fonts, too.
Choose the media you are using to install from. We will be using FTP. You need to choose the remote FTP server from where FreeBSD will be downloaded: please choose Australia #5 (ftp5.au.freebsd.org) which is in Canberra.
You now need to select the correct network device, which will be the Ethernet card. At this point, you have to enter the network parameters specific to your machine. Don't choose DHCP!. Use the sheet provided to enter your parameters. Make sure you don't transpose gateway and name server!
Things are now ready to roll. Up to now, nothing on your disk has been altered. This is your `Last Chance'; cross your fingers and press `Enter'! Alt-F2 shows what's actually going on. Alt-F1 gets you back to the glossy screen. Alt-F4 gives you a shell (eventually). At this point, you can make yourself a cup of tea or coffee. The install takes tens of minutes, and depends on the speed of your CPU, the installation media, and what you selected to install.
Once you have the bulk of FreeBSD installed, the installation menu will ask you some questions:
Normally, you would set the X system up to best match your video card and monitor. Today, we are going to choose a generic video driver and resolution, because it will make things a bit faster.
If you installed the X components, choose to configure the X server. Choose the XF86Setup (fully graphical tool). If you forgot to enable the mouse daemon, do this now.
Press [Enter] to switch to the tool, this takes a while. If the mouse you are using has only 2 buttons. Go into the Card section and choose `Unsupported VGA compatible'. Go into the Monitor section and choose `High-frequency SVGA'. Go into Modeselection and choose the first 3 resolutions and the 8bpp colour depth. Then select Done.
The X server with your chosen configuration will be started. You should be able to see the dialog boxes, and can choose to save this configuration. When asked to create the `X' link, say Yes. Then you get to choose your default X desktop. To make things quick, I would recommend choosing fvwm2.
References
You will be asked if you want to view the FreeBSD package collection. Say No, as we will investigate this later. Say No to adding user accounts. Set the root password to something unguessable.
The installation is now complete. Exit the Install menu, and remove the floppy when you are asked to. At this point, the PC will reboot itself. You will be presented with a short boot menu. F1 should select Windows, and hitting F2 will boot FreeBSD5. Choose the appropriate option to boot FreeBSD from the hard disk. Congratulations, you now have a working, basic, FreeBSD system. You deserve a coffee break!
If you get into difficulties at any stage, grab the workshop presenter sooner rather than later. The aim is to get the basic system installed by 10:45am.
References
You now have a basic, running, FreeBSD system. Log in as root and have a quick tour around. User binaries are in /bin and /usr/bin, sysadmin binaries are in /sbin and /usr/sbin, network daemons are mostly in /usr/libexec, man pages and other useful documentation are in /usr/share, and the kernel source code is in /sys which is a symlink to /usr/src/sys. All the configuration files are in /etc, and we will look at those later. The X Windows binaries and configuration files are in /usr/X11R6.
Check that the system's network connection is working by pinging some external web sites, or by using traceroute or telnet, e.g
  # ping www.ibm.com
  # traceroute www.cs.vu.nl
  # telnet moe.2bsd.com 25
Note that there is no GUI. This is an important point: you do not need a GUI to administrate a FreeBSD system. This can be a saviour if you are stuck in upper Botswana with only a Telnet connection back to the box. If you desperately require a GUI and you have configured X windows, type the command startx to get X running.
A vanilla FreeBSD installation is probably missing some tools that you desperately require, such as a different shell or editor. Personally, I always install tcsh and lsof once I boot the system.
To do this quickly, we are going to use the FreeBSD packages. These are a collection of pre-compiled binaries of applications, services or libraries for FreeBSD, similar to the packages offered in Linux and Solaris. It makes installing extra software fast and easy, but you don't get to make the compile-time choices, so it can be a bit inflexible.
To do this on FreeBSD, run /stand/sysinstall. You will be presented with the installation menu you saw earlier. It's worth exploring this tool, but make sure you don't do any destructive changes! Go into the Post-install configuration section, and choose `Packages'. Select FTP, and choose the ftp server ftp.au.freebsd.org6. The index of packages on ftp.au.freebsd.org will be downloaded, and you can then select packages from particular categories, or you can see the entire list in the `All' section.
Choose a few small and essential tools like tcsh, lsof, less, a different shell or editor. Don't choose ssh, Apache or Samba, as we will install those via a different method later. Once you have chosen a set of packages, go back up a level and select to install them. These will be downloaded and installed for you. If a package has a dependency on another package, then this will be downloaded for you too.
Exit the /stand/sysinstall program when all the packages have been installed. The details of each package has been recorded in /var/db/pkg. If at a later date you want to remove a package, list that directory to see the packages, and use pkg_delete, e.g
  # ls -1 /var/db/pkg
      . . .
  lyx-1.0.3
  mkisofs-1.12b5
  mpeg_encode-1.5b
  mpegaudio-3.9
  mpegedit-2.2
  mpg123-0.59r
  mplex-1.1

  # pkg_delete mpegedit-2.2
Depending on the shell you are using, you might need to run the rehash command before you can run the newly-installed packages.
At this stage, you should create yourself a non-root user account. Good system administrators only use the root account when absolutely necessary. There are at least three ways to do this. You can use the vipw(1) command to add a line to the password file, then use the passwd(1) command to set the account's password, then manually construct the new user's home directory. Alternatively, you can use the adduser(8) command to do most of the work for you. Alternatively, run /stand/sysinstall, go into Post-install configuration and then User Management.
FreeBSD uses a shared password system. Users' details and passwords are stored in two files which must never be world-readable.
-rw-------  1 root  wheel   1109 Dec  8 18:21 /etc/master.passwd
-rw-------  1 root  wheel  40960 Dec  8 18:21 /etc/spwd.db
User details without passwords are stored in two files which should be world-readable.
-rw-r--r--  1 root  wheel    926 Dec  8 18:21 /etc/passwd
-rw-r--r--  1 root  wheel  40960 Dec  8 18:21 /etc/pwd.db
Use either the manual way, /stand/sysinstall or adduser(8) to create your user account. If your username is kim, place your home directory in /usr/home/kim, and choose your shell from one of those listed in /etc/shells. Make your main group-id staff (numeric group 20).
FreeBSD has a convention that only users who are in group wheel (numeric group 0) can su(1) to root. Once you have created the user account, edit the file /etc/group and add your username to this group:
wheel:*:0:root,kim
FreeBSD provides several `virtual terminals'. Enter the key sequence Alt-F2 to switch to the second virtual terminal, and try to log in as the new user. If something goes wrong, please ask for help from the workshop presenter. You can use Alt-F1, Alt-F2, Alt-F3 and Alt-F4 to switch between the four available virtual terminals.
Remember to never leave root logged in on any of the virtual terminals when you are not physically present at the PC's console keyboard.
References
All of the main configuration files in FreeBSD are stored in /etc, and most have their own on-line manual page. Unlike SystemV systems, FreeBSD has only a few rc (bootup) scripts, and no concept of runlevel. This is generally not a problem.
The main bootup script is /etc/rc, and you should never have to edit it. This script also calls the other rc scripts in /etc as required at boot time: rc.atm, rc.devfs, rc.diskless1, rc.diskless2, rc.firewall, rc.i386, rc.isdn, rc.local, rc.network, rc.pccard, rc.serial.
When /etc/rc starts, it first reads a pile of variables from the file /etc/defaults/rc.conf. These set the default behaviour for the FreeBSD boot sequence. But /etc/rc also reads variables from /etc/rc.conf. You need only to edit this file to modify how FreeBSD boots and what services it starts up. An example rc.conf file might be:
# This file now contains just the overrides from /etc/defaults/rc.conf
# Please make all changes to this file.

# -- sysinstall generated deltas -- #
update_motd="NO"
moused_type="mouseman"
moused_enable="YES"
gateway_enable="YES"            # Set to YES if this host will be a gateway.
network_interfaces="ed1 lo0"
ifconfig_ed1="inet 10.10.1.2  netmask 255.255.255.0"
hostname="wkt.slip.adfa.edu.au"
portmap_enable="NO"
sendmail_flags="-bd -q1m"
#
# Variables manually added by Warren, with comments taken from
# /etc/defaults/rc.conf
#
firewall_enable="YES"           # Set to YES to enable firewall functionality
firewall_type="open"            # Firewall type (see /etc/rc.firewall)
natd_enable="YES"               # Enable natd (if firewall_enable == YES).
natd_interface="ppp0"           # Public interface to use with natd.
natd_flags="-log -dynamic"      # Additional flags for natd.
It is worth your while to read through both /etc/defaults/rc.conf and /etc/rc.conf to see what bootup behaviour can be set, and what configuration is peculiar to your system.
Hint: A good system administrator can always get back to a previous configuration if they make a change that doesn't work properly. As most configuration files on FreeBSD are text files, I always use RCS to provide backups for these files.Before I modify a file for the first time, I check the original version into RCS:
  # cd /etc
  # mkdir RCS     if it doesn't exist
  # ci -u rc.conf
  enter description, terminated with single '.' or end of file:
  >> .            Give a short message, or just a single dot
Then I can check-out a new version for editing:
  # co -l rc.conf
  revision 1.1 (locked)
  # vi rc.conf      and make changes as required
Once I am happy with the new version of the file, I check in that new version and add some comments explaining the reason behind the change.
  # ci -u rc.conf
  new revision: 1.2; previous revision: 1.1
  enter log message, terminated with single '.' or end of file:
  >> added portmap_enable="NO" as we don't use RPC services
  >> .          End with a single dot
I can then use the RCS commands to see the differences between revisions, or revert to a previous version of the file if things go wrong.
As an activity in modifying the FreeBSD configuration, use the RCS commands above to check-in and out /etc/rc.conf, then edit it to contain these extra lines:
  #
  # Manual changes
  sendmail_enable="YES"           # Run the sendmail daemon (or NO).
  sendmail_flags="-bd -q5m"       # Flags to sendmail (if enabled)
  portmap_enable="NO"
  update_motd="NO"
  inetd_flags="-l -w"             # Optional flags to inetd.

  ntpdate_enable="YES"             # Run ntpdate to sync time on boot (or NO).
  ntpdate_program="/usr/sbin/ntpdate"          # path to ntpdate
  ntpdate_flags="octarine.itsc.adfa.edu.au"    # Flags to ntpdate (if enabled).

  kern_securelevel_enable="YES"   # kernel security level (see init(8)),
  kern_securelevel="2"            # range: -1..3 ; `-1' is the most insecure
  syslogd_flags="-s -s"           # Flags to syslogd, no UDP port
Most of these will be explained in the Tightening Security section. Don't reboot your system just yet! First we are going to rebuild the kernel to match it to our hardware.
The generic FreeBSD kernel contains lots of device drivers which we really don't need, and also may not contain the kernel functionality that we do need. So, the next thing to do is to recompile the kernel from the source code that you installed, to remove unwanted drivers and to add extra kernel features.
FreeBSD 4.0 does have a few minor bugs. Before we recompile the kernel, it would be a good idea to obtain the most recent version of the 4-STABLE kernel source code, to get these bugs fixed. To do this, we need to install the CVSup tool, which will connect to a FreeBSD CVS server and download any changed files.
Run /stand/sysinstall. Go into the packages installation section. Connect to the ftp.au.freebsd.org server, get the index of packages. Go into the net category and choose the package cvsup-bin-16.1 and install this package. Exit the /stand/sysinstall program. Now create the following /etc/cvsupfile configuration file, which will download the latest kernel source and /usr/include files from the Australian CVS server.
  *default host=cvsup.au.FreeBSD.org
  *default base=/usr/local/etc/cvsup
  *default prefix=/usr
  *default release=cvs delete use-rel-suffix
  *default tag=RELENG_4

  src-sys
With that file created, as root run the command cvsup /etc/cvsupfile to bring your kernel source code into sync with the most recent STABLE release. The kernel source code will be placed in /sys.
Note: This command will fail if your PC does not have a reverse DNS entry mapping the IP address to a hostname. As yet I don't know how to overcome this. This might be a problem in the workshop. If we can't sup the sources to match the 4-STABLE tree, it's no great drama. However, I would recommend that you do keep your kernel source in sync with STABLE. I usually cvsup once a week.
References
To compile a new kernel, you must first create a configuration file describing what devices and features you want the kernel to have. FreeBSD's kernel config files are stored in /sys/i386/conf, so go into there and have a look around. FreeBSD comes with two config files: GENERIC describes the configuration of the generic kernel, and LINT describes every option that can be set in a kernel configuration file. Needless to say, you can't build a LINT kernel!
For the workshop, we will copy the file GENERIC to a new file called WORKSHOP, edit this file, and then rebuild a kernel using the specification in WORKSHOP.
I should have printed the new configuration file WORKSHOP and handed it out to you. It can't be included here because I don't know the hardware setup at the time of writing. If you compare this with the GENERIC file, you will see that I have mostly taken out SCSI controllers and devices, other controllers and devices, and Ethernet cards. I have probably turned on features like SOFTUPDATES, KTRACE, ICMP_BANDLIM and `pseudo-device vn'.
Once the file WORKSHOP exists, we can configure and build the new kernel:
  # config WORKSHOP
  # cd ../../compile/WORKSHOP
  # make depend
  # make
This takes a few minutes to perform. Once done, we can compare the existing kernel and the new kernel:
  # ls -l kernel /kernel
  -rwxr-xr-x  1 root  wheel  2777025 Mar 21 09:50 /kernel
  -rwxr-xr-x  1 root  wheel  1352377 May 29 18:51 kernel
As you can see, we have halved the size of the kernel! FreeBSD allows a choice of which kernel to use at boot time, and it is always a good idea to keep a known-working kernel as a backup, so we will do:
  # mv /kernel /kernel.old
  # mv kernel /kernel
Thus, if the new kernel fails to work properly, we can still boot using kernel.old, and work out what went wrong.
When you have installed the kernel image in /kernel, use the command shutdown -r now to shut the system down and have it reboot with the new kernel.
If the new kernel doesn't work correctly, you can choose to boot using the old kernel at boot time. When you see the next line as part of the boot sequence, type the space key, and enter the commands as shown:
  Booting [kernel] in 9 seconds ...       <-- type space here
  disk1s2a:> unload kernel
  disk1s2a:> load kernel.old
  disk1s2a:> boot
This should be the last time we need to reboot the system today. It should now be time for lunch!
Note: For those interested in enabling soft updates in the kernel
(which improves write performance), please see Appendix ![[*]](cross_ref_motif.gif) .
.
References
On FreeBSD, software can be installed either via the package system, or by downloading the software, configuring and compiling it manually, and installing it by hand. The former is quick and easy, and the latter gives you the most freedom on the software's configuration.
FreeBSD also provides a third alternative, that of `ports'. This is a small set of files which when `run', will fetch the original source code, configure it to match:
and then build and install the software. You will find the Ports in /usr/ports: there are several subdirectories. Once you have changed into a particular port's directory, you can do a make or make install. This:
You are going to use this system to install an SSH client and server onto your box. Change into the port directory /usr/ports/security/ssh. Simply type make to fetch, patch, configure and compile the software. Now type make install to install the software. Finally type make clean to remove the unpacked source code and binary files; the downloaded source is still kept in the /usr/ports/distfiles directory.
Note: If ANU forces you to go through a web proxy, then you will need to set the environment variable HTTP_PROXY to point at the server. You will be told how to do this in the workshop if required.
The make install only installs the software; it doesn't actually start it running. The ssh server, being a local modification, is started up at boot time via an rc script in /usr/local/etc/rc.d. To manually start up the ssh server, run the command
# /usr/local/sbin/sshd
You might like to try installing some of the other ports available, too.
References
Most Unix source code these days is developed using the GNU Autoconf system. After you have downloaded and unpacked the source code, you will find a shell script called Configure or configure. To configure the program for your Unix flavour and hardware, you can usually do:
# ./configure
to run the script. Note: This only sets up the software to know your Unix flavour and hardware. It does not magically work out what specific things you, the sysadmin, want configured into the software. You must read the install documentation and find out what can be tweaked, and what must be tweaked.
Once the software is configured by configure and by you, it has to be built. This is normally done with make:
# make
Hopefully, things build correctly, and then you can install the software. Some programs can be installed with
# make install
but this isn't completely widespread, so again read the documentation. Again note: you may still have to install and edit the program's configuration files before it can be successfully run.
Samba is easy to build and install, and somewhat difficult to configure. We will set Samba up to allow authorised users on your box to mount their home area as a share on their desktop box; we will also provide a community share area. We won't set up printer services.
For Samba, I prefer to build it direct from source code. I like to keep 3rd party source code in /usr/local/src, and the original source distributions in /usr/local/src/Originals. Either or both of these directories need to be created.
Use the FTP client ftp to connect to samba.anu.edu.au as an anonymous user. Change into pub/samba and fetch the latest Samba source code.
After placing the Samba source tarball in /usr/local/src/Originals, change directory to /usr/local/src and do:
  # tar vxzf Originals/samba-2.0.7.tar.gz
  # cd samba-2.0.7
  # cd source
  # ./configure
  # make                        This takes a while
  # make install
  # make clean
That's the easy part over! Most files are installed in /usr/local/samba.
I have given a short Samba configuration file in Appendix .
This allows clients to access their home directory and
a shared area of the server's hard disk. This configuration file goes in
/usr/local/samba/lib/smb.conf.
Once we have created this file, we must create a few directories before we can start Samba running:
  # mkdir /usr/local/samba/var/locks
  # chmod 755 /usr/local/samba/var/locks
  # mkdir /usr/Winshare
  # chmod 1777 /usr/Winshare
We can now start the two servers which together form Samba:
  # /usr/local/samba/bin/nmbd -d 3
  # /usr/local/samba/bin/smbd -d 3
The -d 3 options turn on a moderate level of log output from the servers. To start the servers at boot time, we need to add some lines to /etc/rc.local:
  # put your local stuff here
  /usr/local/samba/bin/nmbd -d 3 && echo -n ' nmbd'
  /usr/local/samba/bin/smbd -d 3 && echo -n ' smbd'
The SMB clients on the LAN should now be able to connect to, and use, the SMB services running on your box.
References
We will build Apache direct from source, just like Samba. We will place the
original source in the directory
/usr/local/src/Originals, and extract it into
/usr/local/src.
Use the FTP client ftp to connect to mirror.aarnet.edu.au as an anonymous user. Change into apache/dist and fetch the latest Apache 1.3 source code. Move it into the /usr/local/src/Originals directory, then change to /usr/local/src and do:
  # tar vxzf Originals/apache_1.3.12.tar.gz
  # cd ../apache_1.3.12
  # ./configure --enable-module=proxy
  # make                        This takes a while
  # make install
  # make clean
As with Samba, Apache creates a directory structure, which lives at /usr/local/apache. The apache/htdocs directory is the place where you keep your web documents. Another useful idea would be to make this directory one of the shares exported by Samba; this will allow LAN clients to upload web pages directly into this area, without having to fuss around with FTP.
We would like to make Apache run as a caching proxy: if one client brings in a web page, then it is cached; the next client who asks for that page will get the one in the cache, and the cost of a second download is removed. To do this, we need to edit the main Apache configuration file /usr/local/apache/conf/httpd.conf around lines 865 to enable this behaviour:
  #
  # Proxy Server directives. Uncomment the following lines to
  # enable the proxy server:
  #
  #<IfModule mod_proxy.c>
  ProxyRequests On
  ProxyRemote * http://harvest.adfa.edu.au:3128  <-- Change for ANU

  <Directory proxy:*>
      Order deny,allow
      Deny from all
      Allow from .adfa.edu.au  <-- Change for ANU
  </Directory>

  #
  # Enable/disable the handling of HTTP/1.1 "Via:" headers.
  # ("Full" adds the server version; "Block" removes all outgoing Via: headers)
  # Set to one of: Off | On | Full | Block
  #
  ProxyVia On

  #
  # To enable the cache as well, edit and uncomment the following lines:
  # (no cacheing without CacheRoot)
  #
  CacheRoot "/usr/local/apache/proxy"
  CacheSize 50000
  CacheGcInterval 4
  CacheMaxExpire 24
  CacheLastModifiedFactor 0.1
  CacheDefaultExpire 1
  NoCache adfa.edu.au
  </IfModule>
  # End of proxy directives.
This does the following: enable caching and proxy requests; allow requests from ANU machines, but not from others; set the cache size to 50Megs; lots of other things.
The cache directory is /usr/local/apache/proxy, and you should have enough disk space free on this partition to fit the given cache size of 50Megs. One thing to note: we point our caching proxy web server at our ISP's caching proxy web server (harvest.adfa.edu.au); this will allow us to utilise its cache as well, thus cutting down our ISP costs. The cache directory needs to be owned by whatever user-id Apache runs as:
# chown nobody /usr/local/apache/proxy
We now need to start Apache running:
  # /usr/local/apache/bin/apachectl configtest
  # /usr/local/apache/bin/apachectl start
The last line can be added to /etc/rc.local, to start Apache running when the server is booted. You should be able to surf to http://your.servers.name and see the default Apache `install completed' web page.
References
I've left the topic of security to last for several reasons. Firstly, I wanted you to get a working system up and running. Secondly, we could spend an entire second workshop looking at system security. What I've given below are some things I have chosen to do on my system, and lots of references to resources where you can get more information.
The first thing I usually do is to list the running processes, and remove the ones not required, and edit rc.conf (or whatever) to stop them from being restarted. We've already turned off portmap in this way, for example. Here's an example ps ax from a box with some services disabled:
# ps ax
  PID  TT  STAT      TIME COMMAND
    0  ??  DLs    0:00.30  (swapper)            Internal kernel process
    1  ??  ILs    0:00.12 /sbin/init --         Getty respawner
    2  ??  DL     0:00.60  (pagedaemon)         Internal kernel process
    3  ??  DL     0:00.00  (vmdaemon)           Internal kernel process
    4  ??  DL     0:00.69  (bufdaemon)          Internal kernel process
    5  ??  DL     0:57.89  (syncer)             Internal kernel process
   27  ??  Is     0:00.01 adjkerntz -i          Sets daylight savings
   74  ??  Ss     0:03.21 syslogd -s -s         System event logger
   94  ??  Is     0:00.29 inetd -l -w           Internet connect server
   96  ??  Is     0:03.78 cron
   99  ??  Is     0:08.34 sendmail: accepting connections on port 25
  108  ??  Is     0:00.01 moused -p /dev/cuaa0 -t auto
  124  ??  Ss     0:08.58 /usr/local/sbin/sshd (sshd1)  SSH server
 1885  p0  Ss     0:00.74 -tcsh (tcsh)                  Root's shell
 1887  p0  R+     0:00.05 ps ax
  130  v0  Is+    0:00.12 /usr/libexec/getty Pc ttyv0   Several of these
 1905  ??  Ss     0:00.22 /usr/local/apache/bin/httpd   Several of these
 1913  ??  Ss     0:00.37 /usr/local/samba/bin/nmbd -d 3        Samba
 1914  ??  S      0:00.01 /usr/local/samba/bin/nmbd -d 3        Samba
 1916  ??  Ss     0:00.03 /usr/local/samba/bin/smbd -d 3        Samba
If you enabled anonymous ftp, then go into the ftp area (/usr/ftp)
and remove the incoming directory. Also go into etc/, and
edit passwd and group to only have details for the users/groups
who are going to be able to store files in the ftp area. Even better,
keep the numeric user-ids and group-ids, but choose some dummy usernames
and group names.
Next thing to do is to edit /etc/inetd.conf and remove any unrequired
network services. In
/etc/inetd.conf, comment out every line except the one for the
telnet service, and modify/add the following lines:
ftp     stream  tcp  nowait/80/5  root  /usr/libexec/ftpd       ftpd -l
telnet  stream  tcp  nowait/15/3  root  /usr/libexec/telnetd    telnetd
The two numbers after the `nowait' specify how many concurrent connection the box can have for that service, and how many connections per minute that service will accept from a given IP address. These help to defend against denial of service attacks.
Save the new /etc/inetd.conf, and send a HUP signal to inetd(8):
  # ps ax | grep inetd
    94  ??  Is     0:00.01 inetd -wW
  # kill -1 94
FreeBSD now has `TCP Wrappers' support built into most network services.
You should edit
/etc/hosts.allow and set up specific allow/deny
rules for each service. Here's an example set of rules (I have removed the
comment lines):
  ALL : localhost : allow
  ALL : my.boxes.full.name : allow

  telnetd: 207.55.197. : allow
  telnetd : .cs.anu.edu.au : allow

  sendmail : ALL : allow
  ftpd : ALL : allow
Next thing to do is to find any program executables which have set-uid or set-gid bits enabled, and remove these bits from those executables you will never run. On my own server, I've done this:
  chmod 555 /bin/rcp /sbin/route /sbin/shutdown
  chmod 555 /sbin/ccdconfig /sbin/dump
  chmod 555 /sbin/rdump /sbin/restore /sbin/rrestore
  chmod 555 cu uu* rlogin rsh lp*         in /usr/bin
  chmod 555 uucp/*                        in /usr/libexec
  chmod 555 mr* sliplogin ppp*            in /usr/sbin
  chmod 555 timedc                        in /usr/sbin
  chmod 555 ifmcstat lpc trpt             in /usr/sbin
I could have deleted these files, but hey, one day I might actually need them, so I can always turn these bits back on again.
FreeBSD, like all the 4.4BSD derived systems, provides extra file protections on files when the kernel is running in a raised secure level. See the chflags(1) manual for details. In particular, files can be marked as non-removable (sunlnk) and unchangeable (schg).
It's a good idea to set these flags on the crucial files on your server: binaries, configuration files that don't change often, rc script files, and the directories that hold these files. The downside is that, once you set the flags, you have to bring the system up into single-user mode to undo the flags.
On my server, I used the following commands to protect some areas:
  chflags schg,sunlnk    /     /dev   /var /etc/rc* /kern*
  for i in /bin /boot /etc/defaults /etc/periodic /sbin /stand /usr/bin \
         /usr/lib  /usr/libdata  /usr/libexec  /usr/sbin
  do echo Doing $i
        find $i -type f | xargs chflags schg,sunlnk
        find $i -type d | xargs chflags schg,sunlnk
        chflags schg,sunlnk $i
  done
You have to change the files first before the directories, because if you do the directories first, they become unchangeable and so you can't set the file flags.
One last thing I do is to change the root user's name to something else, and leave a dummy root entry (with no password) in the master password file:
root:*:0:0::0:0:Charlie &:/root:/usr/local/bin/tcsh
fred:QBudHYS.9CgGUOoREq0:0:0::0:0:Minnie Bannister:/root:/usr/local/bin/tcsh
If the root entry is left at the top, output from ls -l will still show files as being owned by root. But because root has no password, logins, ftp, ssh, and su to that account will fail.
You can also disable certain file functionality as part of the mounting of filesystems. For example, you can turn off set-uid and set-gid operation, and prevent special files (used by devices) from appearing. Here is another example from my server:
 /dev/ad0b       none       swap    sw                      0       0
 /dev/ad0a       /          ufs     rw                      1       1
 /dev/ad0e       /var       ufs     rw,nodev,nosuid         2       2
 /dev/ad0f       /home      ufs     rw,nodev,nosuid         2       2
 /dev/ad0g       /usr       ufs     rw,nodev                2       2
 /dev/ad2f       /tmp       ufs     rw,nodev,nosuid         2       2
 /dev/ad3e       /usr/ftp   ufs     rw,nodev,nosuid         2       2
 #
 # Backup & staging area
 /dev/ad2h       /user      ufs     rw,nodev,nosuid         2       2
 /dev/ad2a       /user/root ufs     ro,nodev,nosuid         2       2
 /dev/ad2e       /user/var  ufs     ro,nodev,nosuid         2       2
 /dev/ad2g       /user/home ufs     ro,nodev,nosuid         2       2
 /dev/cd0c       /cdrom     cd9660  ro,noauto,nodev,nosuid  0       0
Here are some other ideas you might like to consider to secure your system still further.
References
This has been a whirlwind workshop, installing FreeBSD and a handful of network services to create a modest network server. We have hardly touched the surface of using FreeBSD, or correctly setting up the services described. We haven't even delved into other network topics like DHCP, DNS, Sendmail etc.
If you do plan on installing FreeBSD, for whatever reason, then I would heartily recommend that you read as much as possible, and tinker as much as possible, so as to get a feeling for how things actually work. I provide some more references below to help answer any questions you may still have.
One last suggestion: if you do tinker, then remember to use RCS (or some other document control system) to keep on-line backups of all your configuration files. Then, if you make a really bad mistake, you can easily fall back to the last, working, version of your configuration files.
[global]
   socket options = TCP_NODELAY
; Must do this, as otherwise Samba uses the hostname
   netbios name = WSHOP1
   security = user
   interfaces = 10.10.1.1/24 127.0.0.1/8    <-- Will need changing
   printing = bsd
   deadtime = 10
   deny hosts = ALL
   allow hosts = 10.10.           <-- Will need changing
   getwd cache = yes
   read prediction = True
   wide links = yes
   printcap name = /etc/printcap
   load printers = yes
   browseable = yes
   guest account = nobody
   workgroup = HOME
   dns proxy = no
   domain logons = yes
   domain master = yes
   local master = yes
   preferred master = yes
   wins support = yes
   logon script = setup.bat
   passwd program = /usr/bin/passwd
   passwd chat = "Old password:*" %o\n \
                 "New password:*" %n\n \
                 "Retype password:*" %n\n \
		 "passwd: done"
;  You will need a world readable lock directory and "share modes=yes"
;  if you want to support the file sharing modes for multiple users
;  of the same files
  lock directory = /usr/local/samba/var/locks
  share modes = yes

[homedir]
   comment = Your Home Directory
   path = %H
   browseable = yes
   read only = no
   create mode = 0750

[Share]
   comment = Other Shared Stuff
   path = /usr/Winshare
   create mask = 0770
   printable = no
   public = no
   writable = yes
   guest ok = no
This is a full release of the new 4.0-stable (RELENG_4) branch which is currently moving towards the release of 4.1.
This release is aimed primarily at early-adopters and the various other folks who want to get involved with the ongoing development of FreeBSD and are willing to deal with a few bumps in the road. We do our best to ensure that each snapshot works as advertised, but tracking -current is a process which frequently has its off days.
If you're both technically proficient and know exactly what you're getting into here (e.g. you've been following -current) then this snapshot is probably for you. If you're more interested in doing business with FreeBSD than in playing with the cutting edge of technology, however, then 3.x is almost certainly your best bet.
Most information here is also available from the Documentation menu during installation.
It is, again, very important to check the ERRATA.TXT file for any late-breaking issues with this release. If you don't read the ERRATA, you will probably fall right into the same problems that have already been reported (and fixed as noted in the ERRATA).
If you're a developer/hobbies and not interested in QA'd releases so much as simply keeping up to date on the latest FreeBSD technology, you can also install one of our "snapshot" releases.
For the most up-to-date software along the RELENG_3 branch (also known as 3.4-stable), now proceeding towards the release of FreeBSD 3.5, please install your snapshots from:
For the latest 4.0-current (HEAD branch) snapshot releases, please install from:
If you plan to run either -Stable or -Current you MUST be subscribed to the appropriate mailing list, either freebsd-stable or freebsd-current. For information on subscribing to either list (or both), send an e-mail to majordomo@freebsd.org with the following in the body, not the subject, of the letter as appropriate:
subscribe freebsd-stable
subscribe freebsd-current
end
We hope you enjoy using FreeBSD as much as we enjoyed creating it!
Soft updates are a technique of staging writes to the hard disk to improve its write performance while maintaining a better tolerance to power failures than asynchronous writes. For contractual reasons, it is not compiled into the generic FreeBSD kernel. It is worth enabling, and the recipe below describes the steps you should take in order to get it going.
  # cat /etc/fstab
  # Device       Mountpoint      FStype  Options         Dump    Pass#
  /dev/ad0s1b    none            swap    sw              0       0
  /dev/ad0s1a    /               ufs     rw              1       1
  /dev/ad0s1f    /usr            ufs     rw              2       2
  /dev/ad0s1e    /var            ufs     rw              2       2
  proc           /proc           procfs  rw              0       0

  # tunefs -n enable /dev/ad0s1e
  tunefs: soft updates set
  # tunefs -n enable /dev/ad0s1f
  tunefs: soft updates set
  # ctrl-D