System Architecture

(INFT12-212 and 72-212)
Lab Notes for Week 1: The MIPS CPU, Assembly Programming

1  Introduction to System Architecture

Welcome to the System Architecture subject. In the lectures, we will cover the theory of computer architecture and operating systems, along with some coverage of the security features of both. In the labs, we will examine a representative hardware architecture, that of the MIPS family of CPUs, and then switch over to examine the Linux operating system through the use of the POSIX API.

2  The MIPS CPU: a Programmer's Perspective

The first MIPS CPU was released in 1981 and has since grown into a family of 32-bit and 64-bit CPUs, each one improving performance and adding functionality over the previous releases. The MIPS architecture is a very clean and elegant RISC architecture, which is one of the main reasons why we are using it as our representative hardware architecture. In its heyday (the 1990s), the MIPS family was one of the most popular RISC chips to be used. Today, MIPS implementations are primarily used in embedded systems such as Windows CE devices, home routers and video game consoles such as the Sony PlayStation 2 and PlayStation Portable.
Figs/R3000.jpg
MIPS R3000 CPU
In the lectures, we will look at the internal design of CPUs, and the MIPS architecture. In the labs, we will concentrate on how to program the MIPS CPU. To do that, we need to see what functions and features it exposes to the programmer.

2.1  Data Types

MIPS instructions are all 32 bits. There are four basic data sizes supported by the CPU: More complex data structures, such as strings, C structs, Java objects etc. are stored in groups of bytes, halfwords, words and doublewords. There are other issues such as endianness and floating-point storage, which we will cover later.

2.2  Registers

As with most von Neumann architecture CPUs, the MIPS CPU cannot hold all of the data and instructions required to run a program. Instead, data and instructions are copied into a small set of registers inside the CPU. Operations are performed on the registers and the results are stored in the registers.
Because the number of registers are limited, we often need to copy values back out to memory to free up registers so that more data can be brought into the CPU: this is known as spilling the registers.
The MIPS CPU provides 32 registers. Most of them are general-purpose in that the CPU hardware does not impose specific functions on each register. That said, it turns out that the software toolchain (i.e. the assembler, compilers and libraries) do set aside certain registers for certain purposes.
Each register is numbered 0 to 31, and in the MIPS assembly language, each register is identified by its number preceded by a `$' sign, so $12 is register 12. Most of the registers also have a mnemonic name to remind you of their purpose.
Register Mnemonic Name Purpose
0 zero the value 0
1 $at (assembler temporary) Reserved by the assembler
2-3 $v0 - $v1 (values) from expression evaluation and function results
4-7 $a0 - $a3 (arguments) First four parameters for subroutine. Not preserved across procedure calls
8-15 $t0 - $t7 (temporaries) Caller saved if needed. Subroutines can use w/out saving. Not preserved across procedure calls
16-23 $s0 - $s7 (saved values) Callee saved. A subroutine using one of these must save original and restore it before exiting. Preserved across procedure calls
24-25 $t8 - $t9 (temporaries) Caller saved if needed. Subroutines can use w/out saving. Not preserved across procedure calls
26-27 $k0 - $k1 Reserved for use by the operating system kernel
28 $gp global pointer. Points to the middle of the 64K block of memory in the static data segment.
29 $sp stack pointer. Points to last location on the stack.
30 $s8 or $fp saved value / frame pointer. Preserved across procedure calls
31 $ra return address

2.3  Instruction Set

The MIPS family provides instructions to perform the following operations: For more details, see the MIPS Assembly Cheat Sheet and the Wikipedia article on the MIPS CPU.

3  Assembly Language

As with all CPUs, the MIPS CPU only understands machine language, where each instruction is a binary pattern which represents the operation to perform, and the operands to perform it on. Fortunately, there is a more textual, human-readable form for this called assembly language, which is what we are going to learn. A tool called an assembler translates our assembly language programs into the binary machine code, which is what the CPU will run. The assembler does some other jobs for us, such as: All of the above makes our job as assembly language programmers somewhat easier. However, it is still much harder to write in low-level assembly than it is to use a high-level language like C or Java.

3.1  Literals and Registers

Literal integers are written in signed decimal, e.g. 4, 23, 1854, -67. Registers can be named as integers preceded by a `$' sign, e.g. $0, $25, $16, but it is preferable to use their mnemonic name instead, e.g. $sp, $v0, $t3.
Character and string literals are written the same as in Java: single quotes around characters, double quotes around strings, e.g. 'x', 'c', "hello", "Mary had a little lamb".

3.2  Basic Program Structure

MIPS assembly language programs are stored in plain text files ending with the suffix ".s" or the suffix ".asm". You can use any text editor you want to create and edit your assembly programs, but I recommend that you use the MARS simulator described below.
The basic structure of a MIPS assembly language program is:

3.3  Comments and a Basic Template

Comments in your program are written starting with the `#' character, and they extend to the end of the line. The '#' character acts just like the '//' characters used by Java comments.
Putting all of the above together, a basic template for a MIPS assembly language program is this:
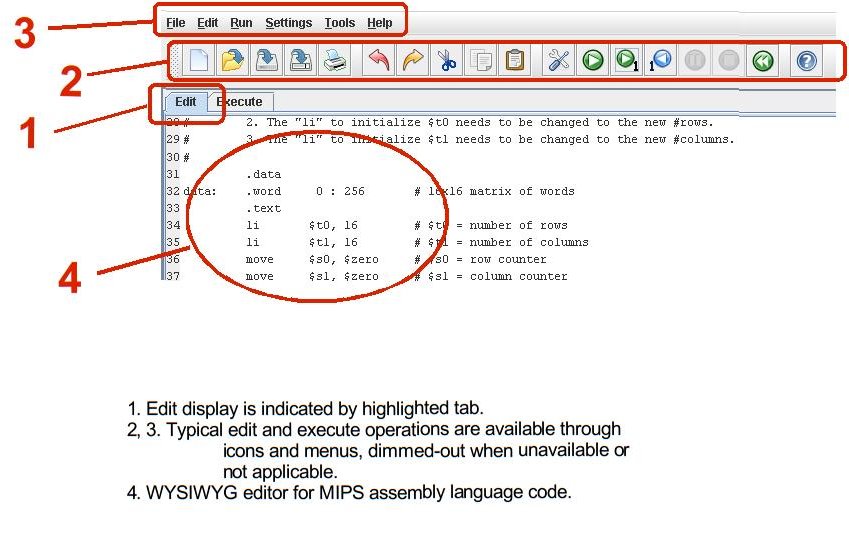
  # Comments describing the purpose of this program, how to use it etc.
  #
  #
        .data            # Data declarations follow this line
                         # ...

        .text            # Instructions follow this line
  main:                  # First instruction to execute
                         # ...
                         # ...
        li	$v0, 10  # system call code for exit = 10 
		syscall  # call operating system

We have not yet covered the names of the MIPS instructions, nor how to write them with their operands; we will do this in future labs. For now, you should definitely read and absorb as much of the MIPS Assembly Cheat Sheet that you can.

4  The MARS Simulator

We are going to use the MARS simulator in the lab. This combines a MIPS assembler, and a simulated MIPS CPU, and it allows you to:

4.1  Download the Simulator

MARS is installed in the Linux Lab, but you may wish to download and use it on your own computer.
Use the above link to the MARS website, go to the Download section and download the jar file which is the MARS simulator, or you can get it from this local copy. You may need to right-click on the "Download MARS" icon and choose "Save As ...". You should be able to download the jar file for MARS and run it on your own Windows, OS X or Linux system. Just make sure that you have the Java J2SE 1.5 (or later) SDK installed on your computer.

4.2  Running the Simulator

On Windows, you should be able to run MARS by finding the jar file in its folder, and double-clicking on it; you might even be able to do this on OS X. On Ubuntu Linux, you can use the Nautilus file browser to find the jar file, right-click on it and choose "Open with Java Runtime".
For OS X and Linux, if you can't get MARS running via the graphical use interface, you can open up a terminal window. Change directory (cd) into the folder where the jar file is, and run the command:
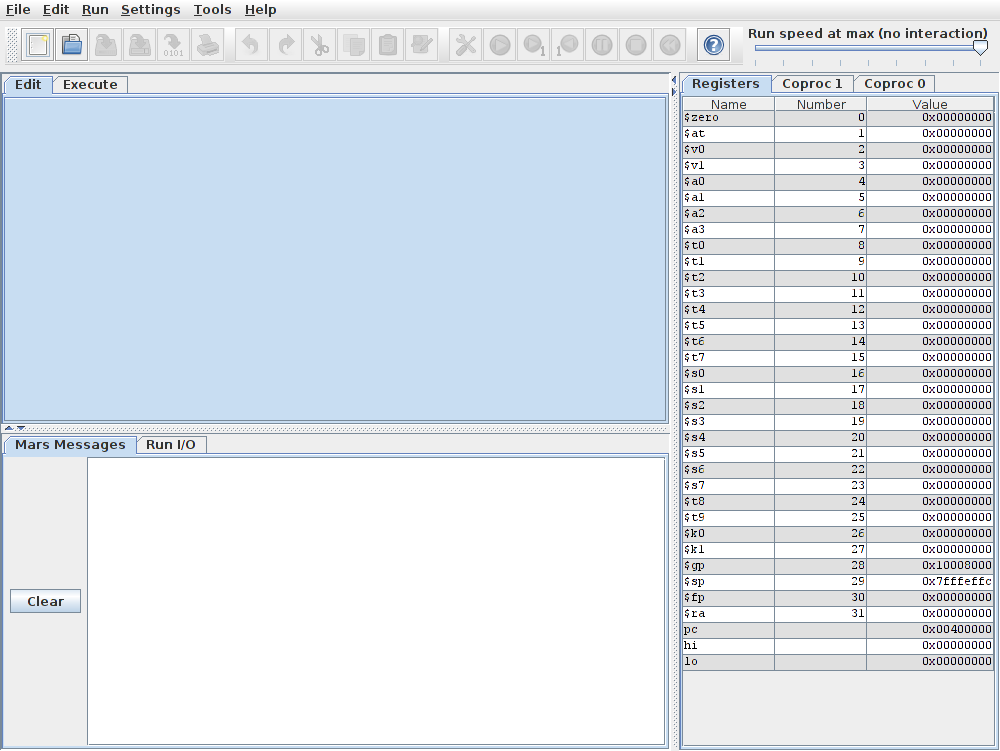
   $ java -jar Mars.jar            # or whatever the jar file is called

When MARS runs, you should see a splash screen for a bit, and then you will get a window like this one:
Figs/mars1.png
On the left, the blue Edit tab will show you your assembly program; once assembled, the Execute tab will display the RAM locations which hold the machine instructions and your program's data. On the right is a display of the 32 registers in the CPU and their values; the other tabs will reveal the floating-point registers.
Down the bottom, the Mars Message tab shows messages from the MARS program, e.g. errors it finds when you try to assemble your program. The Run I/O tab shows the input to your program (i.e. what you type in), and any output that your program prints out.

4.3  Getting Help

The Help menu item at the top of the main MARS window brings up a second window with a heap of concise cheat sheets which are very useful. The main set of instructions for MARS are available here on the MARS website: you should bookmark this link. However, they are quite terse.
There is a tutorial page on the MARS website. The features map document gives a description of the Edit and Execute screens as follows.

4.3.1  Edit Screen

Figs/mars2.jpg

4.3.2  Execute Screen

Figs/mars3.jpg

4.4  The MARS Tutorial

I am reproducing a modified version of the tutorial from the tutorial page on the MARS website, but leaving out the material which is not relevant to this subject. Before following the tutorial, you should save the following assembly program into the same area as you have the MARS simulator jar file: fibonacci.asm.
The example program is fibonacci.asm which compute everyone's favorite number sequence up to the highest number below one million.
  1. Start MARS by double-clicking on its icon, or using java -jar Mars.jar.
  2. Use the menubar File -> Open or the Open icon Figs/marsopen.png to open fibonacci.asm.
  3. In the Edit view, look at the .data section at the top of the file. You should see two ASCII strings, one labelled message and the other labelled newline.
  4. You can use the Settings menu option to configure the MARS displays. The settings will be retained for the next MARS session.
  5. The provided assembly program fibonacci.asm is complete. Assemble the program using Run -> Assemble or click on the Assemble icon Figs/marsassemble.png
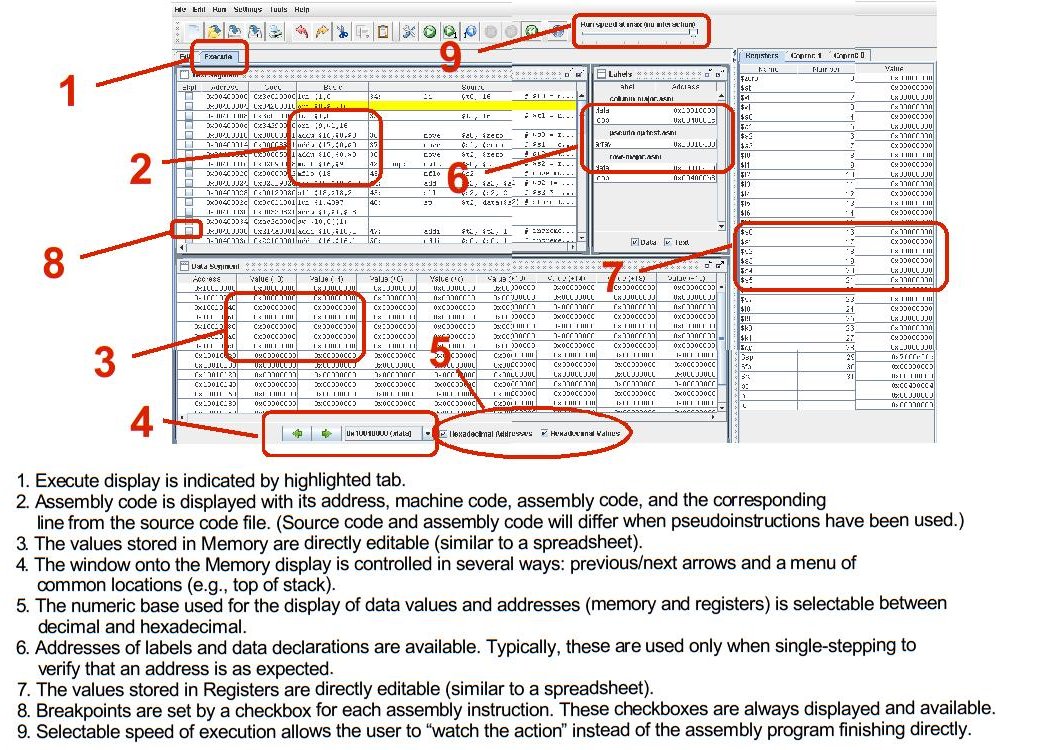
. The display should switch from the Edit view to the Execute view.
  6. In the Execute view, there are 3 sub-windows:
    1. Text Segment, which shows the machine instructions.
    2. Labels, which shows the addresses of labelled items, i.e. variables and jump endpoints.
    3. Data Segment, which shows the RAM locations that hold variables and other data.
  7. Using the Labels sub-window, identify the locations of the message and newline strings. Single-click on each name, and the RAM location which holds this value will be highlighted with a blue border in the Data Segment sub-window. You can use the Hexadecimal Values tickbox to toggle between decimal and hexadecimal display of the values in RAM.
  8. The prompt string starts at address 0x10010000, and is null-terminated (i.e. ends with a byte with value 0). The newline string starts at 0x1001002f.
  9. Locate the Registers display, which shows the 32 common MIPS registers. Other tabs in the Registers display show the floating-point registers (Coproc 1) and status codes (Coproc 0).
  10. Use the slider bar Figs/marsrunspeed.png to change the run speed to about 10 instructions per second. This allows us to watch the action instead of the assembly program finishing directly.
  11. Choose how you will execute the program:
  12. Run the program to completion. Observe the output of the program in the Run I/O display window:
    The Fibonacci numbers below 1 million are
    1 
    1 
    2 
    3 
    5 
    8
    ...
    
    
  13. Modify the contents of a register. (Modifying a memory value is exactly the same.)
  14. Open the Help menu option or use the Figs/marshelp.png icon for information on MIPS instructions, pseudoinstructions, directives, and syscalls.
  15. Challenge: The next Fibonacci number is computed using add $t2, $t0, $t1, but then the value of $t2 is copied into the $a0 register for printing.

4.5  Understanding the Fibonacci Program

You are not expected to grasp the full intricacies of the Fibonacci program this week, but you should read through the code and pick these things up:

5  Outlook for the Next Lab

In our next lab, we will learn the basic set of instructions in the MIPS assembly language so that you can begin to write your own programs. Until then, please go through all of the information above and try to absorb as much of it as you can.


File translated from TEX by TTH, version 3.85.
On 6 Jan 2012, 23:09.